I hadn’t had opportunities to observe a total solar eclipse before 2017, but I knew I wanted to try my hand at photographing it. And photograph it I did!
Before that though, I did some research and captured notes and a simple, fine-grained order of operations, because I didn’t know what I was doing and it’s not something you can really try over again if you fail. Plus, I actually wanted to enjoy the moment without fiddling with my camera, and having a concrete plan helps with that.
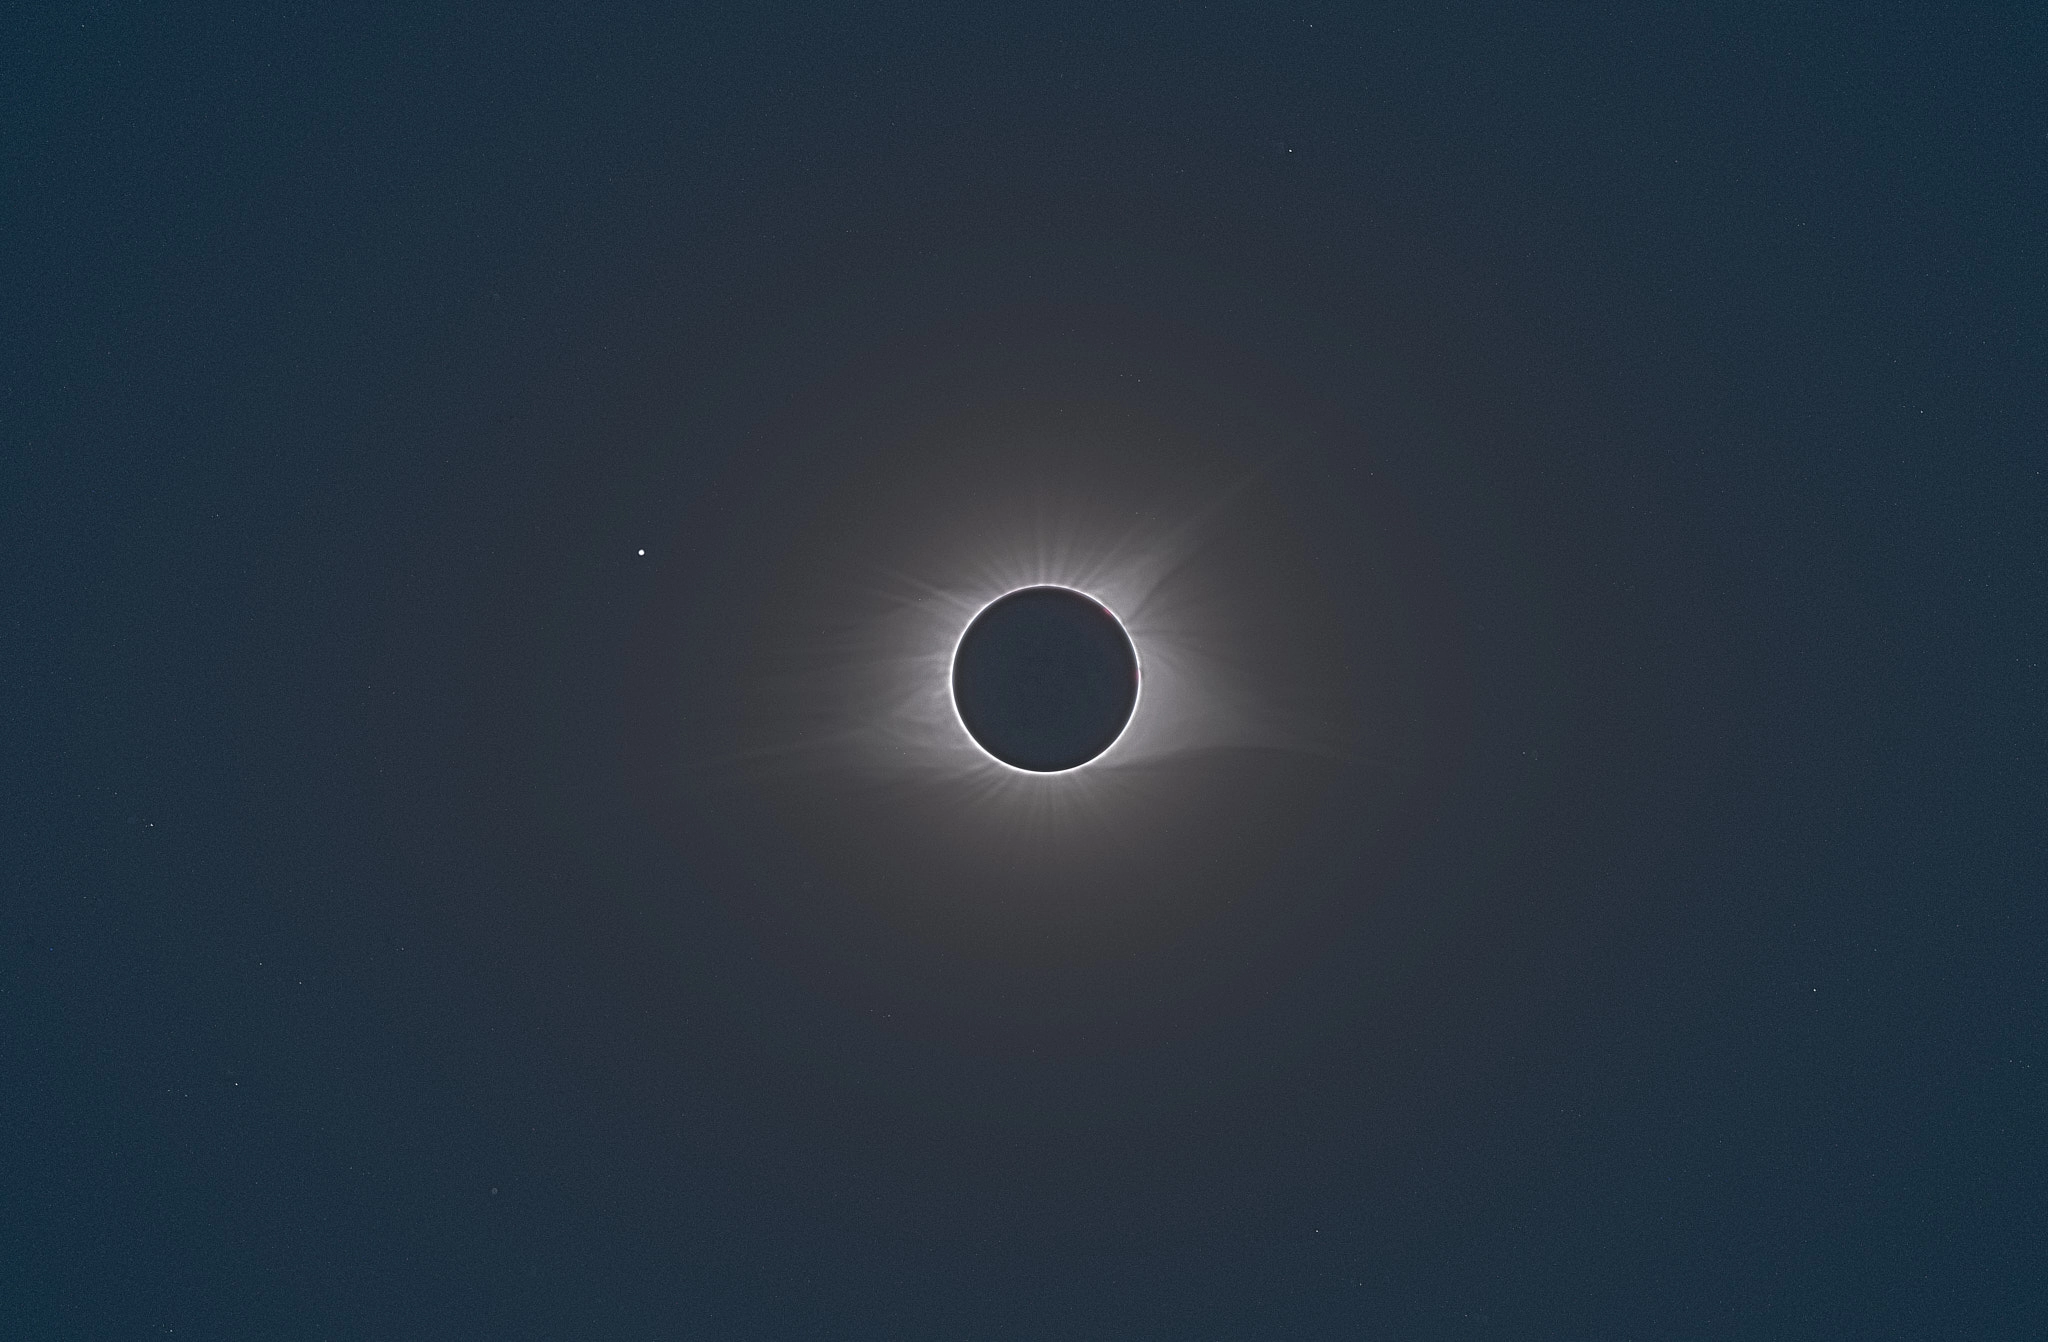
There are a few different images I wanted to try to capture, because there are multiple aspects of the sun that are visible during an eclipse that aren’t normally. In brief, we can observe the sun’s chromosphere, any prominences it might have in the moment, the corona, and, at totality, we can see earthshine on the moon. These can all be composited together to form an image like the one above.
For this eclipse, I was traveling with my tripod, Polarie tracking mount, and Fujifilm X-T2 and 100-400 lens, so figuring out the exposures for each of these phenomenon would happen in terms of the ISO+shutter speed+aperture settings best for that combination of equipment. Jerry Lodriguss has a fantastic write-up that forms of the basis of what I decided to do.
Based on this I settled on using an ISO of 400, an aperture of 5.6 (the widest that lens was at 400mm), and chose shutter speeds from there.
| Phenomenon | Shutter Speed | ISO | Aperture |
|---|---|---|---|
| Chromosphere | 1/8000s | 400 | 5.6 |
| Prominences | 1/4000s | 400 | 5.6 |
| Corona 0.1 Rs | 1/1000s | 400 | 5.6 |
| Corona 0.2 Rs | 1/250s | 400 | 5.6 |
| Corona 0.5 Rs | 1/60s | 400 | 5.6 |
| Corona 1.0 Rs | 1/15s | 400 | 5.6 |
| Corona 2.0 Rs | 1/8s | 400 | 5.6 |
| Corona 4.0 Rs | 1/4s | 400 | 5.6 |
| Corona 8.0 Rs | 1s | 400 | 5.6 |
| Earthshine | 2s | 400 | 5.6 |
This became my sequencing for during the eclipse: I would take an exposure at 1/8000s, then 1/4000s, 1/1000s, etc, all the way up to 2s, then do the same in reverse, from 2s down to 1/8000s. To eliminate the number of things that could go wrong, I decided to manually set the shutter speed (with the X-T2’s physical dial, perfect for this use-case) rather than relying on any automation.
The other decision I made was to use exposure bracketing in camera at ±1 stop. So, I would set the shutter speed above, and the camera would take 3 exposures. This wold maximize the range of possible data I’d have to work with.
I also wanted to get some photos before totality as the moon is moving across the sun’s face. For those there’s a lot more time to experiment.
⚠️ For any photography of the sun outside of totality itself a solar filter specifically designed for observing the sun is absolutely required. I keep seeing advice around the internet to just use ND filters. This is wrong and dangerous.
The core decision I stuck to here was just to follow the same exposure list, with bracketing, I had for totality. Again, this gives me a maximum range of exposure data and is an opportunity to practice.
As I said at the beginning of this post, what I wanted was a straight-forward, fine-grained order of operations I could follow on the day to ensure I was spending as little time as possible fiddling with my camera, and the most time enjoying the experience of the eclipse with my family. Here is the list I ended up with:
Before totality:
- Put new batteries in Polarie
- Set up tripod and Polarie
- Align Polarie
- Put new battery in camera
- Put camera and lens on Polarie
- Put solar filter on lens
- Attach cable release
- Set manual focus
- Set ISO 400
- Set BKT drive mode
- Set 5.6 aperture
- Put solar glasses on face
- Position on sun
- Focus
- Set shutter speed 8000
Partiality:
- 8000
- 4000
- 1000
- 250
- 60
- 15
- 8
- 4
- 1s
- 2s
- Repeat as desired
Totality:
- Remove solar filter
- 8000
- 4000
- 1000
- 250
- 60
- 15
- 8
- 4
- 1s
- 2s
- Gawp
- 1s
- 4
- 5
- 15
- 60
- 250
- 1000
- 4000
- 8000
- Put solar filter on lens
Overall, this made for a satisfying and enjoyable eclipse, with results I’m pleased with. I did knock the manual focus ring on the lens slightly out of focus when removing the solar filter for totality, and so my totality shots are that little bit out of focus. But that’s fine. Other people got sharp, in focus photos of this eclipse. But this is mine, where I was, and with my family as we observed it.